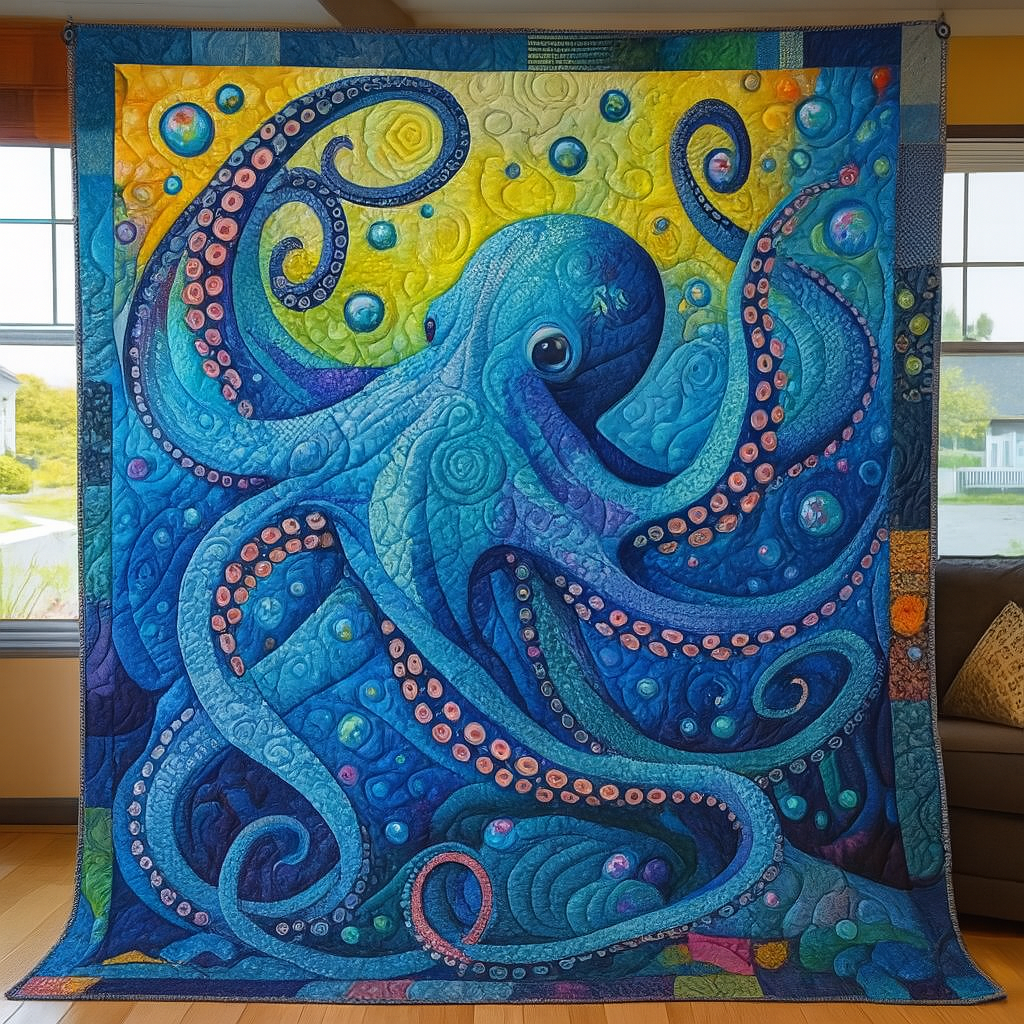
Vibrant Octopus Quilt – Step-by-Step Quilting Tutorial
Introduction:
In the world of quilting, there are projects that tell stories—and then there are those that make a bold, unforgettable statement. This vibrant octopus quilt does both. With its swirling tentacles, rainbow gradient colors, and stunning undersea bubbles, it captures the dynamic spirit of the ocean in every stitch.
Perfect for adventurous quilters and lovers of bold design, this quilt combines the precision of traditional quilting with the imagination of modern art. The octopus, a symbol of adaptability and intelligence, brings life and motion to the piece, while the color palette adds depth, contrast, and whimsy.
Whether you want to showcase this quilt as wall art or use it as a cozy centerpiece for a sea-themed room, this tutorial will guide you through every step—from fabric selection to quilting technique—so you can bring your own octopus to life.
🧵 Materials Needed:
- Quilt top base fabric (approx. 2.5m x 2.5m)
- Batting
- Backing fabric (same size as top)
- Fusible web for applique
- Cotton fabrics in gradients of pink, orange, yellow, turquoise, purple, and blue
- Black and white cotton for eye details
- Fabric markers or embroidery floss (optional)
- Quilting thread in matching and contrasting tones
- Rotary cutter, scissors, pins, quilting ruler
- Sewing machine with free-motion quilting foot
- Iron and pressing surface
🐙 Step-by-Step Instructions:
Step 1: Design Your Octopus
- Either use a pre-made template or sketch your own octopus design.
- Plan the position of each tentacle to create a sense of swirling movement across the quilt.
- Divide the octopus into segments to match fabric color transitions.
Step 2: Cut and Fuse the Octopus
- Cut your base fabrics in various colors to mimic the gradient across the octopus body and tentacles.
- Use fusible web to trace and cut each section of the octopus.
- Position and iron-fuse all the body parts onto the quilt top.
Step 3: Create the Background
- Stitch or piece together a background of bubbles and underwater texture using gradient blues and teals.
- Optional: Add freehand fabric circles (bubbles) in light blues and whites, or quilt bubble motifs.
Step 4: Add Appliqué Details
- Add suction cup shapes to the tentacles using pink and purple fabric circles.
- Create and attach the eye using black, white, and a hint of sparkle.
- Use embroidery or stitching to outline the octopus features for extra dimension.
Step 5: Assemble the Quilt Sandwich
- Lay the backing fabric right-side down.
- Add the batting, then place your finished quilt top right-side up.
- Smooth the layers and baste with pins or spray.
Step 6: Quilt the Design
- Use a walking foot or free-motion quilting to outline the octopus and tentacles.
- Add swirling spiral stitches around the background to mimic underwater currents.
- Use contrasting threads to emphasize depth and movement.
Step 7: Bind the Quilt
- Use vibrant or neutral binding, depending on your style preference.
- Cut strips, attach with a ¼” seam, fold over, and hand-stitch the binding on the back.
✨ Final Touches:
- Add a custom label with your name and date.
- Hang it as art, drape it over a couch, or gift it to a fellow ocean lover!
This octopus quilt is more than just fabric—it’s an undersea adventure. With every stitch, you bring energy, movement, and magic to life. Dive in and enjoy the journey!